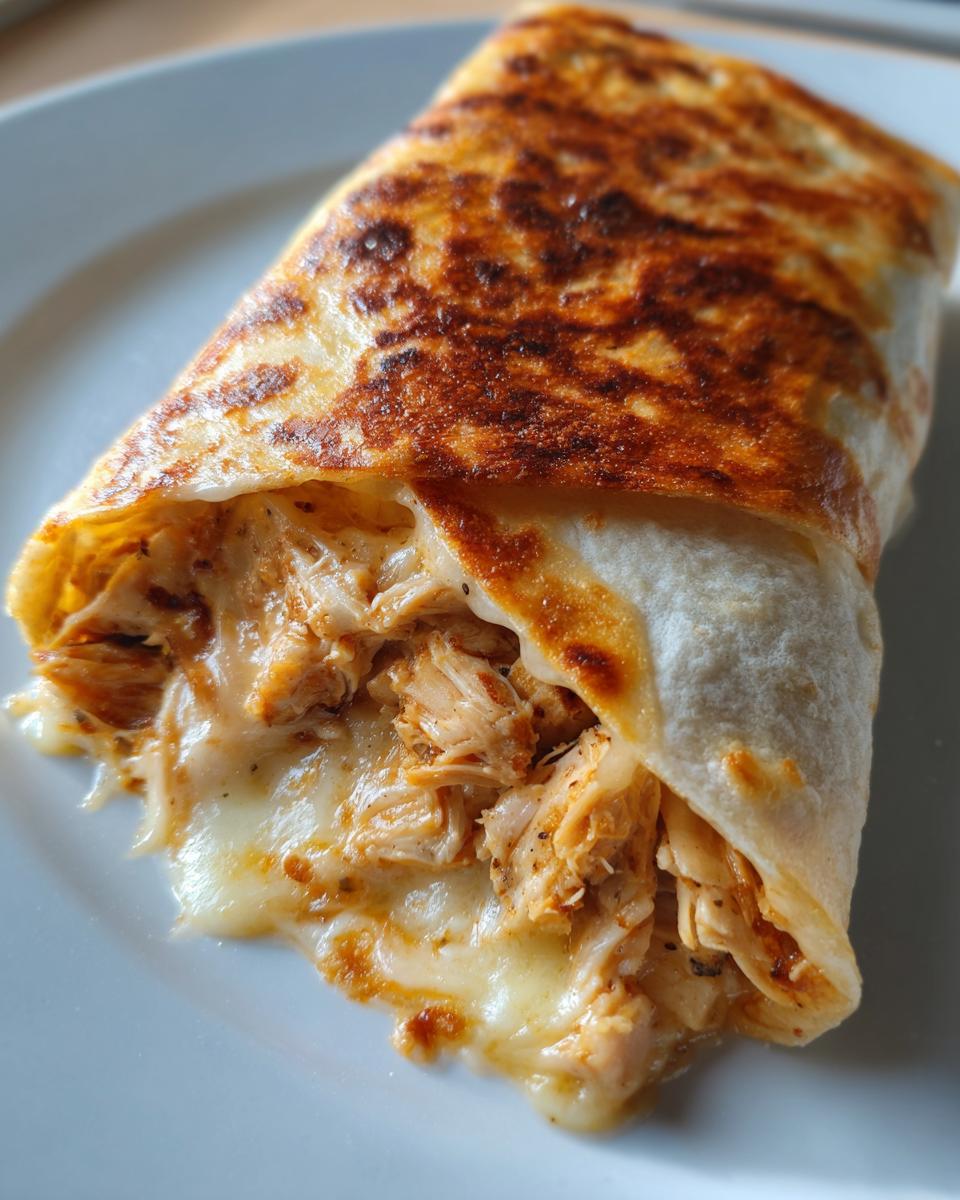
Oh my goodness, let me tell you about these Cheesy Garlic Chicken Wraps – they’re my go-to when I need something quick, satisfying, and packed with flavor. I first made them on one of those crazy weeknights when I had leftover rotisserie chicken and zero energy to cook a full meal. Twenty minutes later, my family was devouring these melty, garlicky wraps like they were gourmet takeout! What I love most (besides the deliciousness) is how forgiving this recipe is. Mess up the measurements? No problem. Forget an ingredient? Improvise! It’s the kind of foolproof meal that makes you look like a kitchen rockstar with minimal effort.
Why You’ll Love These Cheesy Garlic Chicken Wraps
Trust me, these wraps are about to become your new weeknight hero. Here’s why:
- Quick as lightning: From fridge to plate in 20 minutes flat—perfect for those “I forgot to plan dinner” emergencies.
- Garlic lover’s dream: That double hit of fresh garlic and garlic powder? Oh yes.
- Kid-approved magic: My picky eater actually asks for seconds—the melted cheese is irresistible.
- Clean-out-the-fridge friendly: Swap chicken for turkey, add leftover veggies, or try different cheeses.
- No fancy skills needed: If you can stir and fold, you’ve got this.
Seriously, what’s not to love? The way that cheese pulls when you bite in… *chef’s kiss*.
Ingredients for Cheesy Garlic Chicken Wraps
Here’s the lineup for these flavor bombs—nothing fancy, just good stuff that works:
- 2 cups cooked chicken – shredded or diced (rotisserie chicken works wonders here)
- 1 ½ cups shredded cheese – mozzarella for that epic stretch or cheddar for extra tang
- ¼ cup cream cheese – trust me, let it soften on the counter first or you’ll be wrestling lumps
- 2 tbsp butter – melted (salted or unsalted, your call)
- 3 cloves garlic – minced fine (no lazy jarred stuff—fresh is game-changing)
- ¼ cup sour cream – the secret for creamy, dreamy filling
- 1 tsp garlic powder – because we’re serious about garlic here
- 1 tsp Italian seasoning – or just toss in some dried oregano if that’s what’s in your pantry
- 4 large tortillas – burrito-sized (about 10-inch) so you can stuff ’em properly
- Salt and pepper – to taste (don’t skip seasoning the chicken!)
- Fresh parsley – optional, but pretty if you’re feeling fancy
See? Nothing weird—just ingredients that actually make your kitchen smell amazing while you cook.
How to Make Cheesy Garlic Chicken Wraps
Okay, let’s get cooking! This is where the magic happens—turning simple ingredients into those ooey-gooey wraps we all love. I promise it’s easier than you think, and I’ll walk you through every step so you avoid the rookie mistakes I made the first time (no one wants bitter burnt garlic or a wrap that falls apart!).
Preparing the Garlic Chicken Filling
First, grab your favorite skillet—I use my trusty cast iron—and melt that butter over medium heat. Now, here’s the important part: don’t walk away when you add the minced garlic! Stir it constantly for just 1-2 minutes until it’s fragrant and golden, not brown. Burnt garlic turns bitter fast, and we want that sweet, aromatic flavor shining through.
Toss in your cooked chicken and sprinkle with garlic powder, Italian seasoning, salt, and pepper. Stir everything together until that chicken is coated in all those delicious seasonings. Meanwhile, in a separate bowl, mix the softened cream cheese and sour cream. Pro tip: If your cream cheese is still a bit cold, microwave it for 10 seconds—just enough to make it blend smoothly without turning liquid.
Now combine the warm chicken mixture with the cream cheese mixture. This is when you’ll see the magic happen—the heat from the chicken helps melt everything together into this luscious, creamy filling that’ll make your taste buds dance. Set this aside while we prep our wraps.
Assembling and Cooking the Wraps
Lay out your tortillas on a clean surface. Spoon about ¾ cup of the chicken mixture onto the lower third of each tortilla, then sprinkle generously with the remaining shredded cheese. Here’s how to fold like a pro: first fold the sides inward about an inch, then roll tightly from the bottom up, tucking as you go. Don’t overstuff—you want to be able to close them!
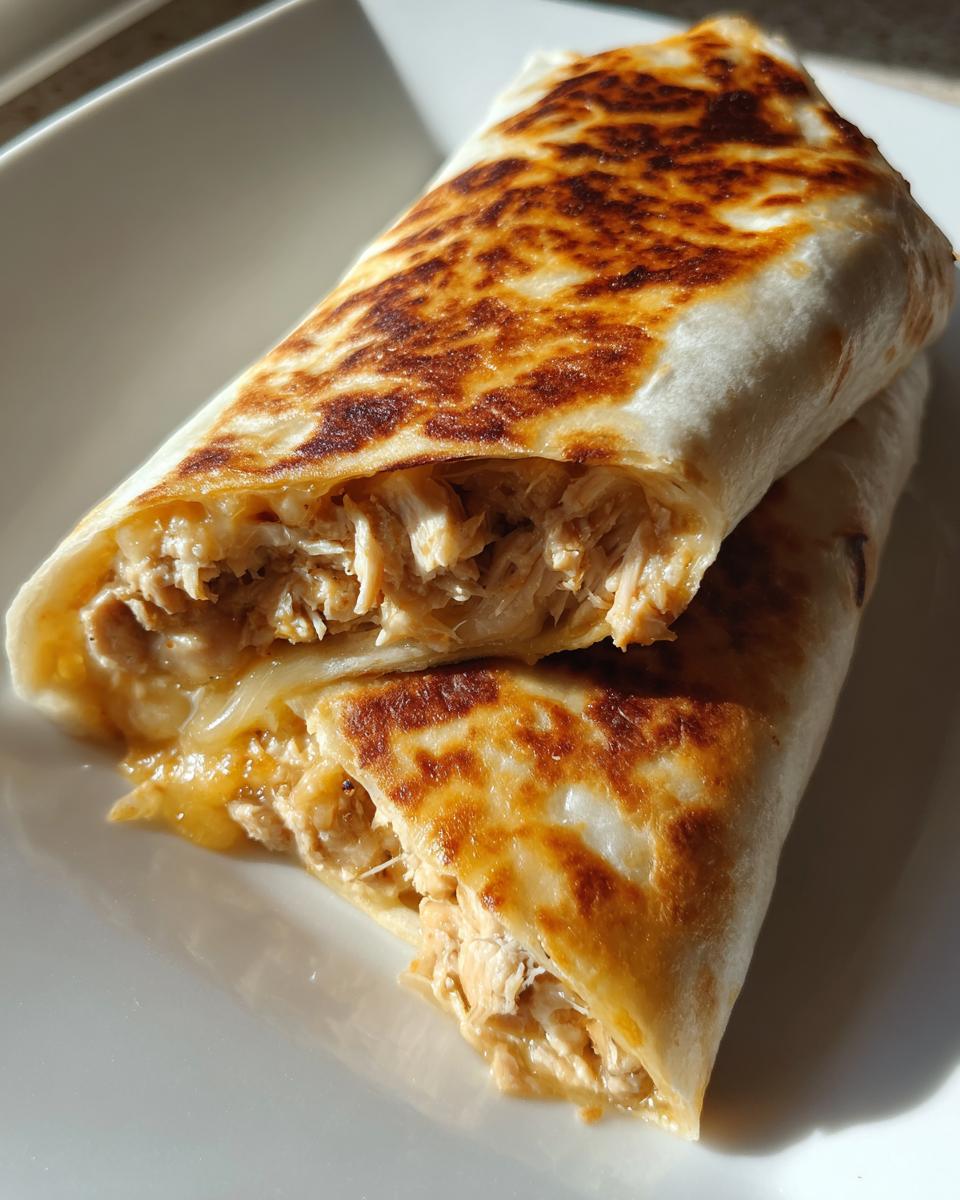
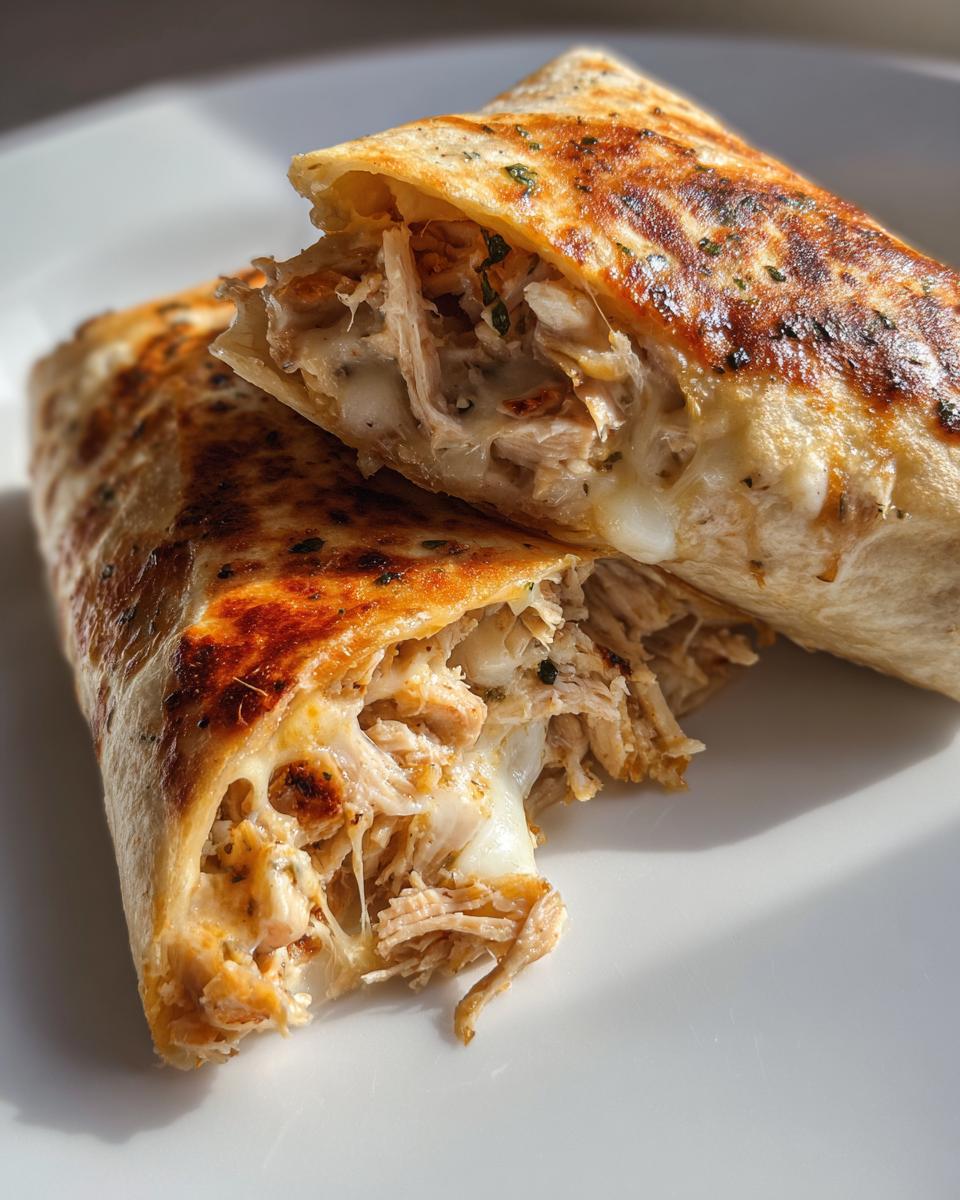
Heat your skillet (or a grill pan if you want those fancy marks) over medium heat—no oil needed. Place your wraps seam-side down first—this helps seal them. Cook for 2-3 minutes per side, pressing gently with your spatula. You’re looking for golden brown spots and that telltale melted cheese oozing out the sides. If you want to get fancy, sprinkle some chopped parsley on top before serving—it makes for great Instagram pics and adds a fresh pop of flavor.
And voilà! You’ve just made restaurant-quality wraps in your own kitchen. Now try not to burn your mouth diving in too fast—that cheese stays molten hot!
Tips for Perfect Cheesy Garlic Chicken Wraps
Listen, I’ve made these wraps more times than I can count—sometimes at 2 AM after a long shift—so I’ve learned all the tricks the hard way! First: rotisserie chicken is your best friend. It’s already perfectly seasoned and saves you so much time. If your wraps keep falling apart? Easy fix—don’t overfill them, and make sure your tortillas are fresh (stale ones crack). For extra crispy wraps, press them down gently with your spatula while cooking. And here’s my golden rule: let the cheese cool for a minute before biting in, unless you enjoy molten lava burns (we’ve all been there!).
Variations for Cheesy Garlic Chicken Wraps
Oh, the fun part—making these wraps your own! Add sautéed mushrooms or spinach to the filling for extra veggies (my kids don’t even notice). Swap the cheeses—pepper jack kicks up the heat, while gouda adds smokiness. Craving crunch? Toss in some crispy bacon bits. For a buffalo twist, mix in hot sauce with the sour cream. The possibilities are endless—that’s what makes this recipe so brilliant!
Serving Suggestions for Cheesy Garlic Chicken Wraps
These wraps are delicious on their own, but oh boy—they become a full meal with the right sides! My family loves them with a simple crisp Caesar salad (the garlic in both is a match made in heaven). For something heartier, try roasted sweet potatoes or garlic parmesan green beans—they soak up all that melty cheese. And if you’re feeling extra, whip up a quick ranch or chipotle mayo dip for dunking. Pro tip: Serve with extra napkins—things get gloriously messy!

Storing and Reheating Cheesy Garlic Chicken Wraps
Here’s the good news—these wraps actually keep beautifully! For leftovers, wrap them tightly in foil or pop them in an airtight container in the fridge for up to 3 days. Want to freeze? Just skip the fresh parsley, wrap individually in plastic wrap, then foil—they’ll stay perfect for 2 months. When reheating, I swear by my toaster oven or air fryer (about 5 minutes at 375°F) to bring back that crispy exterior. The microwave works in a pinch, but expect softer wraps—though still delicious!
Cheesy Garlic Chicken Wraps Nutritional Information
Each wrap packs about 420 calories with 30g protein—perfect for keeping you full! Remember, these numbers can change based on your exact ingredients (like using low-fat cheese or extra chicken). My rule? Enjoy every melty bite guilt-free—it’s all about balance!
Frequently Asked Questions About Cheesy Garlic Chicken Wraps
I get questions about these wraps all the time—here are the answers to the ones you’re probably wondering about right now:
Can I make these ahead of time? Absolutely! Assemble the wraps (without cooking) and store them in the fridge for up to 24 hours. Just add an extra minute to each side when you’re ready to cook. The garlic flavor actually gets better!
What’s the best gluten-free option? Use your favorite GF tortillas—the sturdier ones work best. I’ve had great luck with almond flour wraps, though they brown faster so watch them closely.
Help! My filling keeps falling out! Two tricks: 1) Let your filling cool slightly before wrapping (warm = runny), and 2) Don’t skip folding in the sides first—it creates a little pocket.
Any good vegetarian swaps? Mushrooms! Sautéed portobellos with garlic make an amazing substitute. Or try chickpeas mashed with the cream cheese for protein.
Why use both fresh garlic AND garlic powder? Fresh gives that bright, punchy flavor while the powder adds depth. Together? Garlic perfection. But if you’re in a pinch, double one or the other.
Rate This Recipe
Did you make these wraps? I’d love to hear how they turned out—leave a comment or snap a pic of your cheesy masterpiece!
Print
“22-Minute Cheesy Garlic Chicken Wraps You’ll Obsess Over”
- Total Time: 20 minutes
- Yield: 4 wraps 1x
- Diet: Low Lactose
Description
Cheesy Garlic Chicken Wraps are a quick and flavorful meal featuring tender chicken, melted cheese, and garlic-infused flavors wrapped in a soft tortilla.
Ingredients
- 2 cups cooked chicken, shredded or diced
- 1 ½ cups shredded mozzarella or cheddar cheese
- ¼ cup cream cheese, softened
- 2 tbsp butter, melted
- 3 cloves garlic, minced
- ¼ cup sour cream
- 1 tsp garlic powder
- 1 tsp Italian seasoning
- 4 large tortillas
- Salt and pepper to taste
- Fresh parsley for garnish, optional
Instructions
- In a skillet, melt the butter over medium heat. Add the minced garlic and sauté for 1-2 minutes until fragrant.
- Add the cooked chicken to the skillet. Season with garlic powder, Italian seasoning, salt, and pepper. Stir well to coat the chicken evenly and heat through.
- In a bowl, combine the softened cream cheese, sour cream, and half of the shredded cheese. Mix until smooth.
- Remove the skillet from heat. Add the chicken to the cream cheese mixture and stir until fully combined.
- Lay out the tortillas and divide the chicken mixture evenly in the center of each. Sprinkle the remaining shredded cheese on top. Fold the sides of each tortilla over the filling and roll tightly into wraps.
- Heat a clean skillet or grill pan over medium heat. Place the wraps seam-side down and cook for 2-3 minutes per side, until golden brown and the cheese is melted.
Notes
- Be careful not to burn the garlic as it will turn bitter.
- Use leftover rotisserie chicken for added flavor and convenience.
- Ensure the cream cheese is softened for easy mixing.
- Press down gently with a spatula for even browning and to help seal the wraps.
- Prep Time: 10 minutes
- Cook Time: 10 minutes
- Category: Main Dish
- Method: Stovetop
- Cuisine: American
Nutrition
- Serving Size: 1 wrap
- Calories: 420
- Sugar: 2g
- Sodium: 680mg
- Fat: 22g
- Saturated Fat: 12g
- Unsaturated Fat: 8g
- Trans Fat: 0g
- Carbohydrates: 28g
- Fiber: 2g
- Protein: 30g
- Cholesterol: 95mg