Oh my goodness, if you haven’t jumped on the Biscoff train yet, you’re missing out! That spiced cookie butter flavor is absolutely magical in desserts. I’ve been obsessed with creating the perfect vegan Biscoff cheesecake ever since my dairy-free cousin begged me for a dessert she could actually eat at family gatherings. After what felt like a million test batches (okay, maybe just seven), I finally nailed this no-bake beauty that’s so creamy, you won’t believe it’s vegan. The best part? No oven required—just blend, freeze, and try not to eat the whole thing in one sitting while you wait. Trust me, this dessert disappears faster than a sleeve of Biscoff cookies at my house!
Why You’ll Love This Vegan Biscoff Cheesecake
Let me count the ways this dessert will steal your heart! First off, it’s:
- Crazy easy – No baking, no fuss, just blend and freeze. Perfect for when you need an impressive dessert without the stress.
- Dreamily creamy – The cashew base creates a velvety texture that rivals traditional cheesecake (no one will guess it’s dairy-free!).
- Biscoff heaven – That caramelized spice flavor shines through in every bite, from the crunchy crust to the luscious topping.
- Allergy-friendly – No eggs, no dairy, and you can easily make it gluten-free too (just use GF Biscoff cookies).
I swear, this cheesecake makes converts out of even the most skeptical dairy lovers at every potluck!
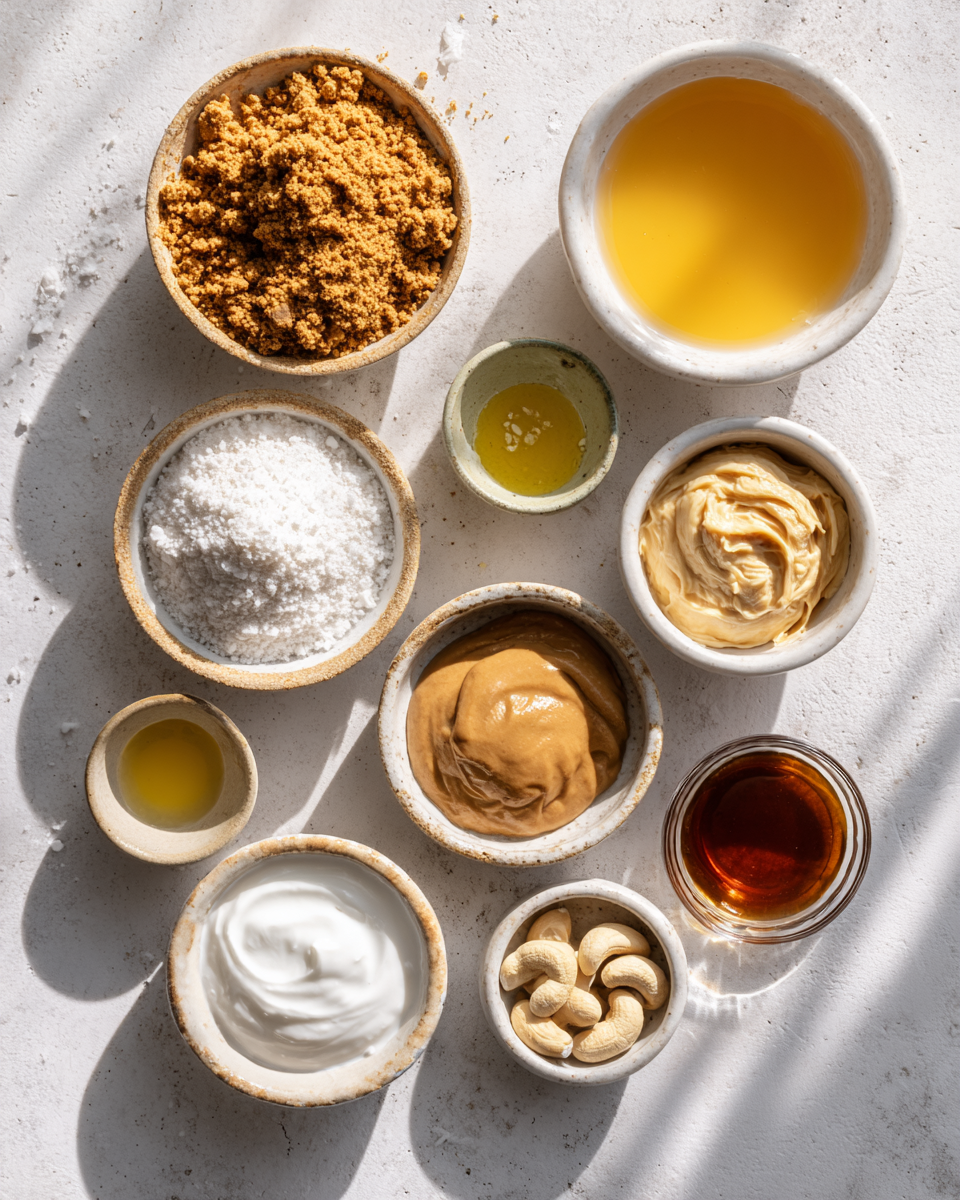
Ingredients for Vegan Biscoff Cheesecake
Gather these simple ingredients for magic:
- 2 cups Biscoff cookie crumbs (about 24 cookies – measure after crushing)
- 1/4 cup melted coconut oil (unrefined for subtle coconut flavor)
- 2 cups raw cashews, soaked overnight or quick-soaked in boiling water for 1 hour
- 1/2 cup coconut cream (the thick part from a can of full-fat coconut milk)
- 1/2 cup pure maple syrup (grade A for mild flavor)
- 1/4 cup fresh lemon juice (about 2 medium lemons)
- 1 tsp pure vanilla extract (skip the imitation stuff!)
- 1/2 cup Biscoff spread for topping (the creamy kind in jars)
Ingredient Notes & Substitutions
No Biscoff cookies? Use gingersnaps or graham crackers + 1 tsp cinnamon for the crust. Out of coconut oil? Melted vegan butter works too. For nut allergies, try sunflower seeds instead of cashews (soak same way). If maple syrup isn’t your thing, agave or date syrup blends nicely. Can’t find coconut cream? Use the thick top layer from 2 cans of refrigerated coconut milk. And while I adore the caramelized Biscoff topping, warmed peanut butter makes a delicious plan B drizzle!
Equipment You’ll Need
You won’t need fancy gadgets for this vegan Biscoff cheesecake, just a few basics:
- 9-inch springform pan (essential for clean slices!)
- High-speed blender (a food processor works in a pinch)
- Measuring cups and spoons
- Rubber spatula (for scraping every last bit of that delicious filling)
- Small saucepan (just for warming the Biscoff topping)
That’s it! Now let’s make some magic happen.
How to Make Vegan Biscoff Cheesecake
Okay, let’s dive into making this dreamy dessert! Don’t let the simplicity fool you – every step matters for that perfect creamy texture and bold Biscoff flavor. Here’s exactly how I make it, with all my little tricks to guarantee success.
Step 1: Prepare the Biscoff Crust
First, grab those Biscoff cookies and turn them into crumbs – I like using my blender for this, but a food processor or even a zip-top bag and rolling pin works too. You want fine crumbs, but don’t go overboard – a few tiny chunks add nice texture. Mix with melted coconut oil until it looks like wet sand (that’s your sign it’ll hold together). Press firmly into your springform pan, but don’t go Hulk-mode – too much pressure makes the crust dense. Just enough to form an even layer about 1/4 inch thick. Pop it in the freezer for 10 minutes to set while you make the filling.
Step 2: Blend the Cheesecake Filling
Here’s where the magic happens! Drain your soaked cashews (they should feel squishy between your fingers) and add them to your blender with all the other filling ingredients. Now blend, blend, blend – I’m talking at least 2-3 minutes in a high-speed blender. Stop to scrape down the sides a couple times. You want this silky smooth, like thick pancake batter. No graininess allowed! If it’s stubborn, add a tablespoon of non-dairy milk to help it along, but don’t overdo it – we want that rich, creamy texture.
Step 3: Assemble and Freeze
Time to bring it all together! Pour your velvety filling over the chilled crust. I like to tap the pan gently on the counter to release any sneaky air bubbles. Use a spatula to smooth the top – imperfections add character, so don’t stress perfection. Now, the hard part: patience. Freeze for at least 4 hours, though overnight is even better. Cover with foil if freezing longer to prevent freezer smells.
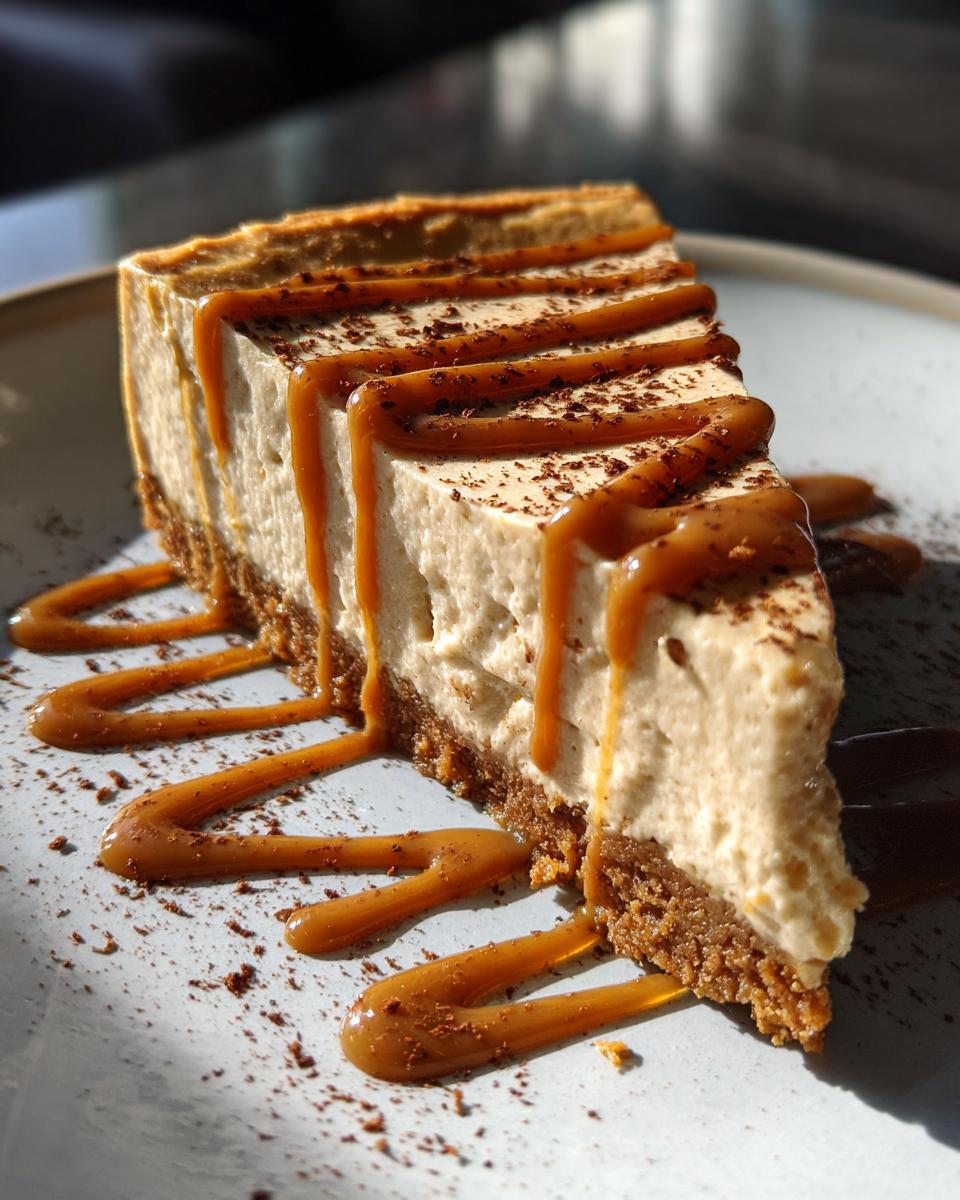
Step 4: Add Biscoff Topping
The grand finale! Warm your Biscoff spread just until it’s pourable (10-15 seconds in the microwave does the trick). Let it cool slightly so it doesn’t melt the cheesecake. Now go wild with your drizzle – I like zigzags, but swirls or even a thick layer look gorgeous too. Pro tip: Use a spoon or piping bag for more control. Slice and serve immediately, or return to freezer if not eating right away.
Tips for Perfect Vegan Biscoff Cheesecake
After making this cheesecake more times than I can count, here are my foolproof secrets for the best results every time:
- Soak those cashews properly – Overnight is ideal, but if you’re in a hurry, pour boiling water over them and let sit for 1 hour. This makes them blend silky smooth!
- Let it breathe before serving – Take the cheesecake out of the freezer 10-15 minutes before slicing. It softens just enough for perfect creamy texture.
- Crust thickness matters – Too thin and it crumbles, too thick and it overwhelms. Aim for about 1/4 inch – the back of a spoon works great for evening it out.
- Blend patience – Seriously, let that filling blend longer than you think necessary. Grainy cheesecake is a sad cheesecake.
- Freeze flat – Make sure your freezer shelf is level unless you want a lopsided dessert (been there!).
Serving and Storage Suggestions
Here’s how to keep your vegan Biscoff cheesecake tasting its absolute best! For perfect slices, let it sit at room temperature for about 10 minutes before cutting – your knife will glide through like butter. Leftovers? No problem! Just wrap individual slices in plastic wrap or store the whole cheesecake in an airtight container. It keeps beautifully in the freezer for up to 2 weeks (though let’s be real – it’ll disappear way before then!). Pro tip: Write “hands off!” on the container unless you want sneaky midnight snackers helping themselves!
Vegan Biscoff Cheesecake Variations
Once you’ve mastered the classic, try these fun twists! Swirl 1/4 cup melted vegan chocolate into the filling before freezing for a marbled effect. Craving extra crunch? Press crushed roasted hazelnuts into the crust or sprinkle on top. For a caramel dream, drizzle with date caramel before serving. My personal favorite? Layer sliced bananas between the crust and filling – it tastes like banana bread and Biscoff had the most delicious baby!
Vegan Biscoff Cheesecake FAQ
I get so many questions about this dessert – here are the ones that pop up most often!
Can I use peanut butter instead of Biscoff spread?
Absolutely! While it won’t have that signature spiced cookie flavor, warmed peanut butter makes a delicious drizzle. Just thin it with a bit of coconut oil to get that perfect pourable consistency.
Is this cheesecake gluten-free?
Almost! Just swap the Biscoff cookies for gluten-free gingersnaps or speculoos cookies (check labels carefully). The filling is naturally gluten-free as long as your other ingredients are too.
Why won’t my filling get smooth?
Two likely culprits: not soaking the cashews long enough (they should squish easily) or using a weak blender. If you’re struggling, blend in small batches or strain the mixture through a fine sieve before freezing.
Can I make this ahead for a party?
Yes! In fact, it tastes even better after 24 hours in the freezer. Just add the Biscoff topping right before serving so it stays pretty.
Help! My cheesecake cracked when I cut it.
No worries – that’s what the gorgeous drizzle is for! For cleaner slices, run your knife under hot water between cuts. The cracks just mean it’s extra creamy inside, which is a win in my book!
Nutritional Information
Just a heads up – these numbers are estimates since ingredients can vary. But here’s the scoop per slice of this heavenly vegan Biscoff cheesecake: About 320 calories, with 18g fat (7g saturated), and 35g carbs. The natural sugars from maple syrup and Biscoff make it sweet without being overwhelming. Remember, it’s plant-based, so you’re getting goodness from those cashews and coconut too! As always, adjust toppings if you’re watching sugar intake – the base cheesecake is plenty flavorful on its own.
Share Your Creation!
I’d love to see your vegan Biscoff cheesecake masterpieces! Tag me on Instagram @BiscoffQueen with your creations – nothing makes me happier than seeing your gorgeous swirls and happy taste-testers. Did you love it? Leave a star rating below and tell me your favorite part. Your feedback helps me create more delicious recipes just like this one!
Print
Irresistible Vegan Biscoff Cheesecake – No-Bake Magic in 7 Steps
- Total Time: 4 hrs 20 mins
- Yield: 8 servings 1x
- Diet: Vegan
Description
A creamy vegan cheesecake with a spiced Biscoff cookie crust and smooth filling, perfect for any occasion.
Ingredients
- 2 cups Biscoff cookie crumbs
- 1/4 cup melted coconut oil
- 2 cups raw cashews (soaked overnight)
- 1/2 cup coconut cream
- 1/2 cup maple syrup
- 1/4 cup lemon juice
- 1 tsp vanilla extract
- 1/2 cup Biscoff spread (for topping)
Instructions
- Blend Biscoff cookies into fine crumbs and mix with melted coconut oil.
- Press the mixture into a springform pan to form the crust and freeze for 10 minutes.
- Blend soaked cashews, coconut cream, maple syrup, lemon juice, and vanilla until smooth.
- Pour the filling over the crust and freeze for 4 hours.
- Warm Biscoff spread slightly and drizzle over the cheesecake before serving.
Notes
- Soak cashews for at least 4 hours if short on time.
- Use a high-speed blender for the smoothest filling.
- Store leftovers in the freezer.
- Prep Time: 20 mins
- Cook Time: 0 mins
- Category: Dessert
- Method: No-bake
- Cuisine: International
Nutrition
- Serving Size: 1 slice
- Calories: 320
- Sugar: 22g
- Sodium: 150mg
- Fat: 18g
- Saturated Fat: 7g
- Unsaturated Fat: 9g
- Trans Fat: 0g
- Carbohydrates: 35g
- Fiber: 2g
- Protein: 5g
- Cholesterol: 0mg